I had been keen to change my cell phone for some time (this was in Oct 05 ). As Ihave so far been a Nokia user for around 8+ yrs I automatically gravitated tothis brand. After doing the usual rounds of surfing the Nokia site I was not mpressed by whatever I saw, except maybe the 6230i, but that my brother had bought that June and had a real bad time (Read that review) & 6681 but thathas a 1.3 mega pixel camera. But I was interested in the upcoming models likethe 6270, 6280 etc. when I went to my friendly neighborhood dealer in Shivaji Park he advised me to wait for the 6270 which was due in Dec 05 (according to Nokia). Jan 2006 came & went and there was no sign of this model in Mumbai that was when I seriously decided to look @ other manufacturers like Sony Ericsson coz my main worry was how to export my contacts from a Nokia phone toa SE phone. Once that was settled I went thru their site & short-listed theK750i & W800i. The specs on paper r same but the K750i was cheaper. So Iopted for it.
The dealer told me the price was Rs 15500 (much cheaper than a so called authorized dealer like Sierra) with bill & warranty (In Mar 2006) . I was presented asealed green coloured box which said it was a limited edition piece. (It hasSania Mirza on the cover, not that it matters to me). On opening it I got a pleasant surprise that it contained an external flash, which can be fitted tothe phone wow. (Incidentally even the dealer didn’t know of this). This is notfound in the usual box, which is over all white in colour. After checking the piece thoroughly I decided this was for me.
I wont bore u with the specs of this phone as u can find it on their website. The display is crystal clear though fades in sun, Reception and voice quality is both proved excellent, as also itsbattery life.
Camera The camera is a 2-mega-pixel camera,which is very good, there’s also a in built light, which can be used while taking a photographs and performs v well even under poorly lit conditions. Also since I got afree external flash I find that very useful. Here are some
Some Tips for Camera function
1 = Opens menu with"picture size" ready to select
4 = Toggles Macro mode (forclose up photos)
7 = Toggels Night mode
* = Toggles Light
0 = While in video modetoggles length of recording.
Press <> to adjust the exposure.
Lazy to access the Camerafunction through the Menu? Simply press and hold the camera button and the camera function will be activated! Another useful feature of the model is the presence of an auto focus. It works for any distance including the Macro mode.I have taken a sunset shot form a room thru a plate glass window & it cameout really well, which was a real surprise. U can also adjust the brightness ofthe picture being taken. The camera supports three possible resolutions -1632x1224, 640x480, 160x120 pixels. Two types of data compression, Normal andFine, are available. If ‘Normal is selected quality is quite good, and photo’slook quite well. The photos differ in size depending on the resolution. Thus a photo in the Normal mode takes about 300 KB when the Fine quality gives 500-600KB. Saving the photo takes the same time not depending on the case, that is about 1-2 seconds. I have taken a sunset shot with the phone camera thru a picture window glass which u can see below
The audio player was a surprise for meas I found that the audio quality quite good, I hear it will get better after upgrading the firmware :) There’s also a play list. Using the device as an mp3 player brings no real serious battery life shortage, energy consumption iscomparable in the radio mode too. Equalizer setup is present among the other settings (Bass, Voice, Tremble etc), as well as the ability of creating your own settings. Depending on these settings the sound will actually change, thisis noticeable. The presence of a memory card turns the K750 into a fully functional mp3 player with good quality.
Radio The phone also has a built-in FM tuner. Phone’s memory can store up to 20 radio stations; the stereo headset that is part of every package, which is quite good also plays the role of antenna. U can also use the loud speaker which is good & does not cause jarring except @ v high volume :) In case you are using auto-search the phone willfind about 6-7 stations with the strongest signal’s coverage and store them in the memory. At the same time radio stations with weaker signal, but prettysuitable for listening will be skipped. They can be added into the listmanually. If u minimise the radio display, u can listen to the radio AND usesome other function eg: make & receive calls, send SMS etc
Phonebook can contain 500 entries with multiple entries allowed. For backups the PC Suite (like Nokia) does not allowback ups of the phone book. U have to use MS Outlook or MS Outlook Exp to synchronize ur phone book. For some reason u cannot see the contacts on the SIM card ALONG with those in the phone (like Nokia) unless go thru the menu. Only the contacts on the phone can be seen.
Messages Features found here r common to most phones.
Organizer.
First the ‘Calendar’. There are three types of event view, monthly, weekly and daily. In last case you see the list of all things to do and reminders, in the other two modes you will notice the highlighted time with events or the day. Fast forward to a specific year, day or month is present. It’s kept simple and,
The ‘Scheduler ‘allows you choice to choose one of the 6 icons assigned to the action type, specify the place where it will occur, length and setup reminder (beforehand or in the entered time). I was could not find a way to setup reoccurrence rate; maybe I have to spend more time on it J. From the editing menu you can choose another time and date for separate events.
‘Reminders’ work even if the phone is turned off, in case you turn on this function in the settings menu. Pleasant peculiarity of this model is that you can turn on/off automatic switch of profiles after the event had occurred, as well as return to the earlier set profile after the event is over.
The ‘To do list’ allows, only two modes of events, call or reminder. On the other hand this is pretty enough, simplicity has its own advantages as well.
The phone has support for sending schedules to different devices (like IrDA, Bluetooth). Same thing can be sent from your office or desktop PC without any additional software for synchronization.
‘Notes’. The phone supports recording short text notes; in common list first word from each is displayed.
‘Alarm clocks’. The phone has single as well as reoccurring alarm clock, which can be setup by the defined days of week. The alarm clocks will work even if the phone is turned off.
‘Countdown timer’. Everything is pretty simple here, although same thing can be said about the stopwatch, it supports intervals. The phone has ‘Code storage’ feature, there’s also a ‘Calculator’ and ‘World time’ function.
What I like
1. The clarity & resolution of the screen is both bright and clear as well as unusually sharp due to its resolution of 176 x 220 pixels & 262,144-colour TFT LCD
2. I like the feel of the keypad quite crisp.
3. When this phone is connected to the PC thru the cable it gets charged, which can be useful for people who use the phone for Internet connectivity.
4. Another thing I have observed is that if u have a person in ur phone book & he calls from a new number which u would like to add against his name it can be easily done. Real handy
5. My friend has tried this feature, though I cant vouch for it as I don’t have a Sony TV, is that the phones infrared port can be used to operate Sony TVs.
6. The phone also has a feature, I haven’t seen in other phones. An online update service where the user can update his phone’s firmware (software) through the internet for free. And each one brings, new features or improvements on the phones current features, like increase in speaker volume etc.
What I like don’t like
1. It has 40 polyphonic ring tones, which I find to be unsuitable for our noisy Indian environment except the SE default tune. But u can add ur own.
2. The USB cable given with the kit is quite long. Today’s PCs have front USB outputs, thus there is no need for such a long cable. That’s true for notebooks and other portable gadgets. Maybe I am nit picking :)
3. Making of groups can be used only for sending multiple sms and not for assigning ring tones to a particular group. U have to assign a ring tone to an individual contact only.
4. While using the hands free speaker a lot of background noise is picked up if u increase the volume to the higher side
5. I miss the auto brightness control for the screen (like the newer Nokia phones).
6. Headset provided to listen songs doesn’t allow changing channels using the button in head set. Activity menu pops up (whenever a message arrives) though u are doing some other operations.
7. PC Suite which come on the CD or even the latest ver available is very limited as compared to the Nokia PC Suite
8. Another thing I miss from my Nokia days is, I cannot send sms thru my computer using PC Suite when my phone is connected to the PC. Now I am demoted to a two thumb typist as Sony Ericsson PC Suite does not have this feature. :))
Wednesday, October 04, 2006
Tuesday, January 17, 2006
Configuring the D-Link 502T router for MTNL Broadband Do it yourself
One of the most important things is read & take very seriously the message by MTNL about the Tel. wiring in your house. The main telephone wire should first come to the POTS Splitter (comes with the D-Link 502T router), to the socket called ‘LINE” on the splitter. (See diagram below). The wire from the socket called ‘MODEM’ should lead to the D-Link router & the wire from the socket called ‘PHONE’ should lead to a phone or the phone network in your house. The wiring of the router is shown in the MTNL user guide so not mentioned here.

1) You will get a small dialogue box where the user name is admin & password is also admin.
2) Once you have logged in, the HOME directory tab is prominent with the Setup Wizard menu displayed. Click on the ‘Run Wizard’ button in the middle of the screen. A pop up menu will appear. This is the Setup Wizard.

3) This procedure consists of
(a) Setting the time zone
(b) Set the Internet connection
(c) Restart the router.
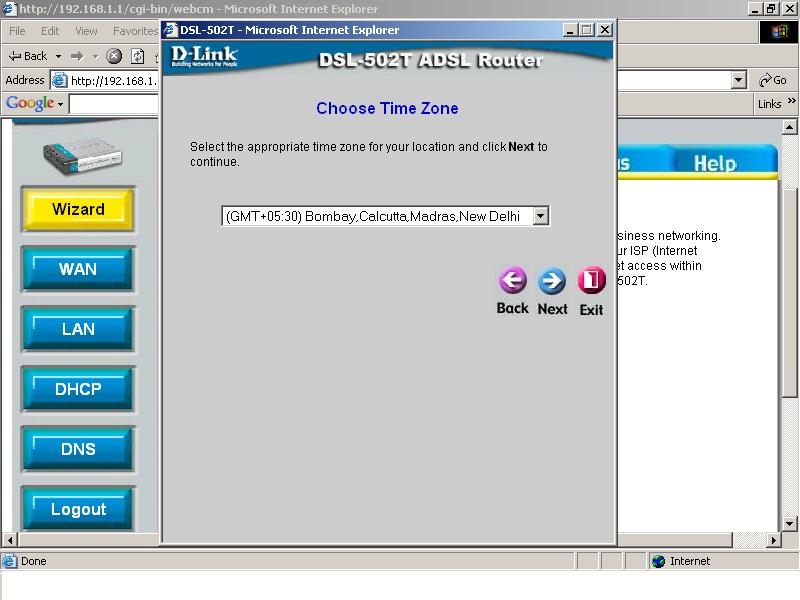
4) Click on the Next button & configure the Time Zone by selecting the appropriate time zone. Click on the Next button after you have made your choice.
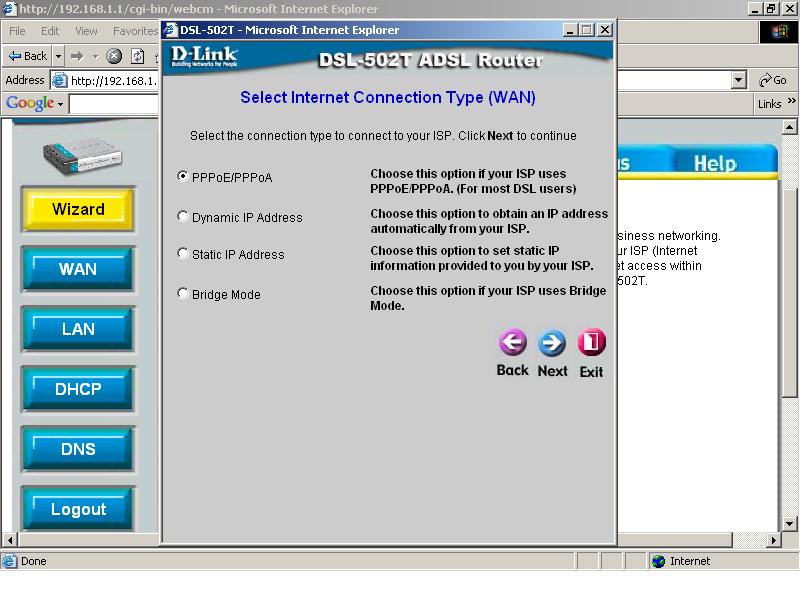
5) Next you have to set the Internet connection type for the WAN interface. On the screen that you see (shown below) select ‘PPPoE/PPPoA’ and click on Next.
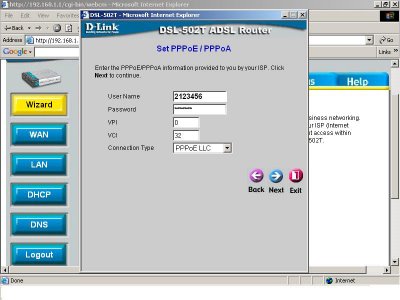
6) In the screen as seen below type in the Username (Your Tel No) & your Password (your CA number, Customer Identification number). This available on your tel bill. VPI should be 0 (zero) and VCI as 32.
These VCI & VPI I have mentioned above is basically for MTNL for the other ISP’s in India it’s the following
Connection Name
|
VPI
|
VCI
|
MTNL
|
0
|
32
|
BSNL
|
0
|
35
|
Airtel
|
1
|
32
|
VSNL
|
0
|
33
|
Connection type should remain as PPPoELLC. Click Next and skip to the Setup Completed menu below.
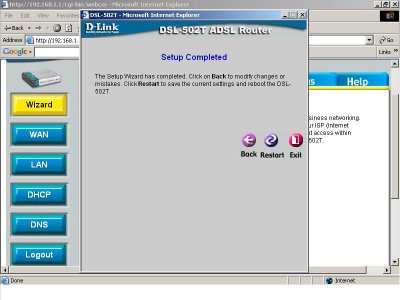
7) Setup Competed: click on the Restart button. At this stage you will get another screen telling you that the ‘The system is now restarting. Please wait’. Please do not turn off the router while it is still displayed
 What is mentioned below is what is done by the MTNL staff to configure the router when they install it at your residence & this is not know to most users.


http://socrates0.blogspot.com/2007/12/how-to-configure-linksys-wrt54g.html

7) Setup Competed: click on the Restart button. At this stage you will get another screen telling you that the ‘The system is now restarting. Please wait’. Please do not turn off the router while it is still displayed
 What is mentioned below is what is done by the MTNL staff to configure the router when they install it at your residence & this is not know to most users.
After you have done the above mentioned settings Click on WAN on the left side of your screen & you will see a screen as seen in Fig 1a.
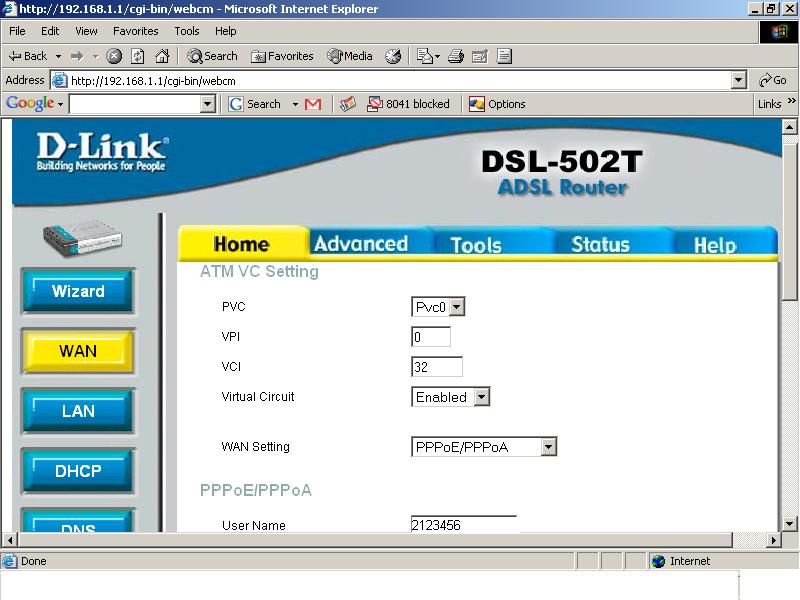
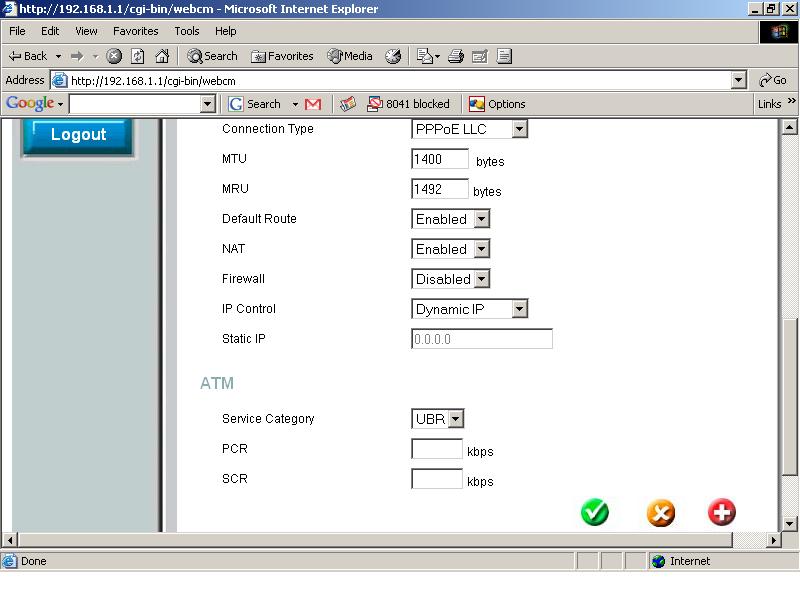
In the 1st field PVC click on the list box (the downward pointing arrow) & select ‘PVC0’. Scroll down (Fig 1b) and click on the ‘Apply’ button seen below.
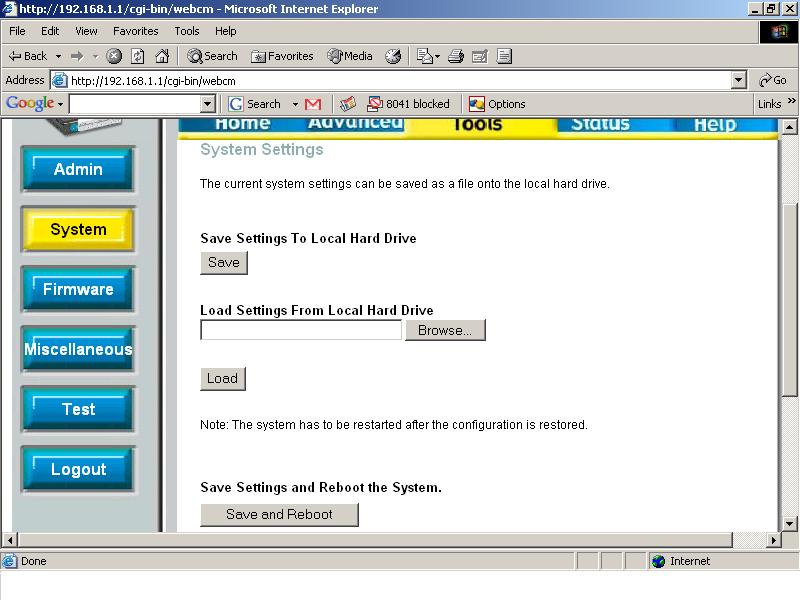
Next click on the ‘TOOLS” button in the horizontal tab seen below and then click on the ‘SYSTEM’ button, scroll down & click on the ‘Save & Reboot’ button. This may take some time, it may also happen you get the browser error ‘Page cannot be displayed’ in that case click on the Refresh button.
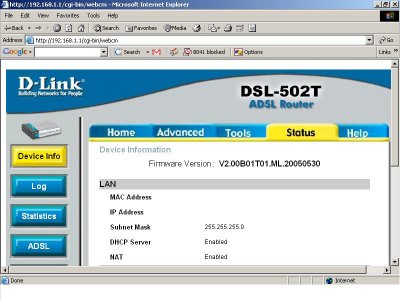
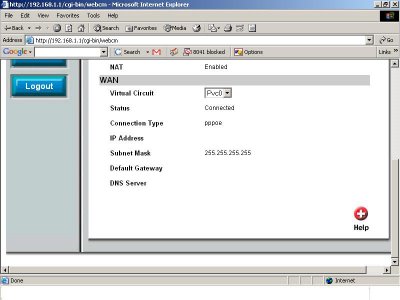
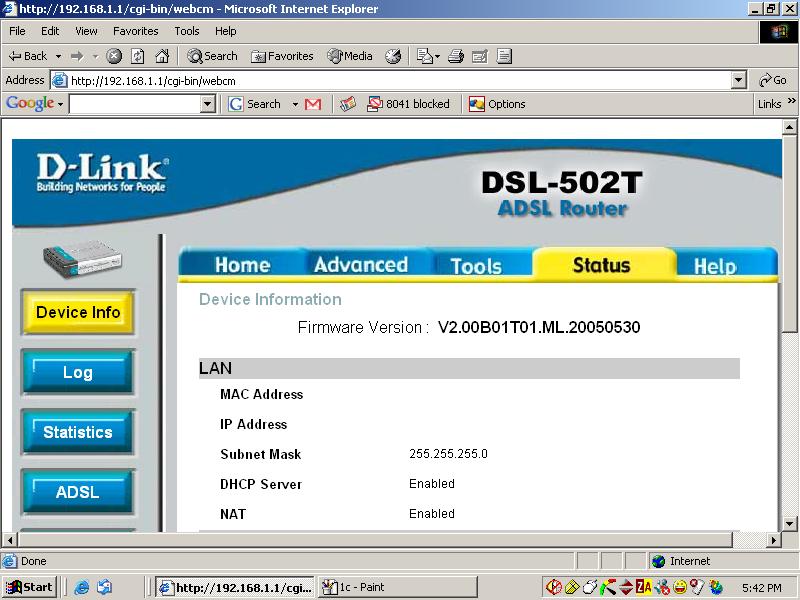
Now you should get a similar screen as seen below (seen in two parts) where the status should be seen as ‘Connected’. You can click on the STATUS button and check the status of your connection. You are now ready for a broadband experience.


PS: You will notice that in the last two screen dumps some fields are blanked out, that in no way should reduce the significance of the overall picture :)
After this is done you can follow what is mentioned in the user guide to change your password, create your email id etc.
All those who want to use a wireless router in conjunction with the above gadget can see the link given below. I used a Linksys WRT54G ver 7.00.1 ) http://socrates0.blogspot.com/2007/12/how-to-configure-linksys-wrt54g.html
A few useful sites are mentioned below.
http://www.whatismyip.com/
http://downforeveryoneorjustme.com/
http://www.dslreports.com/tweaks
https://www.opendns.com/
http://speedtest.net/
http://pingtest.net/
http://airtel.in/speedcheck
https://www.grc.com/passwords.htm
https://secure.pctools.com/guides/password/
http://www.whatismyip.com/
http://downforeveryoneorjustme.com/
http://www.dslreports.com/tweaks
https://www.opendns.com/
http://speedtest.net/
http://pingtest.net/
http://airtel.in/speedcheck
https://www.grc.com/passwords.htm
https://secure.pctools.com/guides/password/
Subscribe to:
Posts (Atom)